PEX Pipe Fittings Installation Tips from Trusted Suppliers

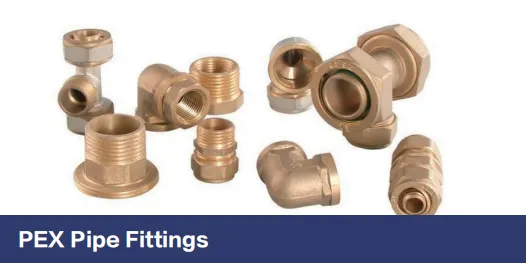
When it comes to plumbing systems, whether you're renovating a home, building a commercial space, or upgrading an old pipeline, the choice of materials and installation quality can make or break the project. In recent years, PEX (cross-linked polyethylene) pipes and fittings have emerged as a game-changer, beloved by plumbers, contractors, and DIY enthusiasts alike for their flexibility, durability, and ease of use. But even the best materials can fail if installed incorrectly. That's why we've teamed up with seasoned pex pipe and fitting supplier experts to bring you this comprehensive guide to PEX pipe fittings installation. From preparation to post-installation checks, we'll walk you through every step, sharing insider tips and common pitfalls to avoid. Plus, we'll explain why choosing the right supplier—one that offers reliable pex pipe fittings solutions —is just as crucial as the installation itself.
Why PEX Pipe Fittings Are Taking Over Modern Plumbing
Before diving into installation tips, let's take a moment to understand why PEX has become the go-to choice for so many projects. Unlike traditional materials like copper or galvanized steel, PEX pipes are lightweight, flexible, and resistant to corrosion. They can bend around corners without the need for elbow fittings, reducing the number of joints (and potential leak points) in a system. But what really sets PEX apart is its adaptability. Whether you're working on a residential hot water line, a commercial HVAC system, or a radiant floor heating setup, PEX can handle it—especially when paired with high-quality fittings from a reputable pex pipe and fitting supplier .
To put things in perspective, let's compare PEX with two other common plumbing materials: PPR (polypropylene random copolymer) and UPVC (unplasticized polyvinyl chloride). While ppr pipe and fitting supplier options are popular for hot water systems due to their heat resistance, PEX offers superior flexibility, making it easier to install in tight spaces. On the other hand, upvc pipe supplier products are great for cold water and drainage lines but lack the expansion capabilities of PEX, which helps prevent bursting in freezing temperatures. Simply put, PEX strikes a balance of strength, flexibility, and cost that's hard to beat—when installed correctly.
| Feature | PEX (from pex pipe and fitting supplier) | PPR (from ppr pipe and fitting supplier) | UPVC (from upvc pipe supplier) |
|---|---|---|---|
| Flexibility | Highly flexible; bends up to 90° without fittings | Moderate flexibility; requires elbows for sharp turns | Rigid; no flexibility; requires precise measurements |
| Freeze Resistance | Expands under freezing conditions to prevent bursting | Limited expansion; may crack in freezing temps | Brittle; prone to cracking when frozen |
| Installation Ease | Quick; uses crimp, clamp, or push-fit fittings | Requires heat fusion; longer setup time | Glued joints; messy and time-consuming |
| Best For | Residential hot/cold water, radiant heating, commercial HVAC | Hot water systems, industrial pipelines | Cold water lines, drainage, irrigation |
Pre-Installation Preparation: The Foundation of Success
As the saying goes, "Measure twice, cut once"—and this couldn't be truer for PEX installation. Rushing into the process without proper preparation is a recipe for leaks, wasted materials, and costly rework. Here's what you need to do before picking up a tool:
1. Gather the Right Tools and Materials
First, ensure you have all the necessary tools. A reputable pex pipe and fitting supplier will often recommend a basic toolkit, which includes:
- PEX Cutter: A sharp, ratcheting PEX cutter is essential for clean, straight cuts. Avoid using a hacksaw, as it can leave jagged edges that weaken the pipe.
- Crimping/Clamping Tool: Depending on the fitting type (crimp or clamp), you'll need a tool that matches the size of your fittings (e.g., ½-inch, ¾-inch). Battery-powered tools are great for large projects, while manual tools work well for small jobs.
- Deburring Tool: After cutting, use this to remove burrs from the inside and outside of the pipe. Burrs can damage O-rings and cause leaks.
- Measuring Tape and Marker: For accurate measurements—never guess!
- PEX Inserts: These rigid plastic inserts prevent the pipe from collapsing when crimped. They're often included with fittings, but double-check with your supplier.
- Go/No-Go Gauge: A small tool to verify that crimps are tight enough (but not too tight). Most suppliers include this with crimp tools.
Next, source your materials from a trusted pex pipe and fitting supplier . Look for PEX pipes labeled "PEX-A," "PEX-B," or "PEX-C"—each has slightly different properties, but all are suitable for residential use. Your supplier should also provide fittings (brass or poly alloy), crimp rings or stainless-steel clamps, and any specialty parts like manifolds or valves. Avoid generic, unbranded products—they may not meet industry standards for pressure or temperature resistance.
Pro Tip: Ask your pex pipe and fitting supplier for a sample kit before starting. Many suppliers offer small bundles of pipes, fittings, and tools so you can practice crimping or clamping on scrap material. This is especially helpful if you're new to PEX installation!
2. Plan Your Layout and Check Local Codes
Before drilling holes or running pipes, sketch out your plumbing layout. Note where pipes will run, where fittings will be placed, and how they'll connect to existing lines or fixtures. This helps you calculate the exact length of pipes needed and minimizes waste.
It's also critical to check local plumbing codes. Some areas have specific rules about PEX installation—for example, requiring PEX to be protected from UV light (it degrades in sunlight) or limiting the number of bends in a single run. A knowledgeable pex pipe and fitting supplier will be familiar with regional codes and can help you ensure compliance. Ignoring codes could lead to failed inspections or even insurance issues down the line.
3. Inspect Materials for Damage
Even the best suppliers can have (occasional) damaged products due to shipping or storage. Before installation, inspect all pipes and fittings for signs of wear: cracks, scratches, kinks, or discoloration. Pipes should be smooth and free of indentations, and fittings should have intact O-rings (if applicable). If you spot any issues, contact your supplier immediately—reputable pex pipe and fitting supplier companies will replace defective items at no cost.
Step-by-Step PEX Pipe Fittings Installation Guide
Now that you're prepared, let's walk through the installation process. We'll focus on crimp and clamp fittings, the two most common types used in residential and light commercial projects. Push-fit fittings are also popular (they "click" into place without tools), but they're often pricier and better suited for temporary repairs or tight spaces.
Step 1: Measure and Cut the PEX Pipe
Start by measuring the distance between two connection points (e.g., a manifold and a faucet). Add ½ inch to this measurement to account for the pipe inserting into the fitting. Mark the pipe with a marker, then use your PEX cutter to make a straight cut. Hold the cutter perpendicular to the pipe and squeeze firmly—the ratcheting action will do the work. Avoid twisting the cutter, as this can create an uneven cut.
After cutting, use the deburring tool to clean the inside and outside edges of the pipe. insert the tool into the pipe, twist it 360°, and repeat on the outside. Burrs can tear O-rings or prevent the pipe from seating properly in the fitting, so don't skip this step!
Step 2: insert the PEX insert (If Required)
For most crimp and clamp fittings, you'll need to insert a PEX insert into the end of the pipe. The insert is a rigid plastic tube that supports the pipe when crimped, preventing it from collapsing. Push the insert all the way into the pipe until it's flush with the end. If it's tight, you can lubricate the insert with a small amount of soapy water (avoid petroleum-based lubricants, which can damage PEX).
*Note: Some push-fit fittings don't require inserts, but always check the manufacturer's instructions (your supplier should provide these with the fittings).
Step 3: Slide on the Crimp Ring or Clamp
If using crimp fittings: Slide a copper crimp ring onto the pipe, leaving about 1/8 inch (3mm) between the ring and the end of the pipe. This space ensures the ring will be crimped onto the fitting, not just the pipe.
If using clamp fittings: Slide a stainless-steel clamp onto the pipe, positioning it the same way as the crimp ring. Clamps are reusable (unlike crimp rings), making them a good choice for projects where adjustments might be needed.
Step 4: insert the Pipe into the Fitting
Push the pipe onto the fitting until it hits the shoulder (the point where the fitting widens). This should be a snug fit—if it's too loose, the pipe may not seal properly. Twist the pipe slightly as you push to help the O-ring (if present) seat correctly. Once inserted, check that the crimp ring or clamp is positioned 1/8 inch from the end of the pipe and ¼ inch from the fitting's shoulder. This is critical for a secure crimp.
Step 5: Crimp or Clamp the Fitting
For crimp fittings: Place the crimp tool's jaws around the crimp ring, aligning the tool with the ring's center. Squeeze the tool firmly until it reaches the stop—you'll hear a "click" on most ratcheting tools. Release the tool and remove it.
For clamp fittings: Position the clamp tool over the clamp, ensuring the tool's dies are centered on the clamp's ears. Squeeze the tool until the ears are flattened against the pipe. Don't over-tighten—this can crack the fitting or damage the pipe.
Pro Tip: After crimping/clamping, use the go/no-go gauge to test the connection. The "go" end should fit over the crimped ring/clamp, while the "no-go" end should not. If the "no-go" end fits, the crimp is too loose—cut the pipe and start over.
Step 6: Test the System for Leaks
Once all fittings are installed, it's time to test the system. For residential systems, close all fixtures and slowly turn on the water supply to build pressure. Let the system sit for 15–20 minutes, then check all joints for leaks. For commercial systems or larger projects, use a pressure test pump to increase pressure to 80 psi (5.5 bar) and hold it for 30 minutes—pressure should not drop by more than 5 psi. If you spot a leak, turn off the water, drain the system, and recheck the crimp/clamp. In most cases, a leak is due to a misaligned crimp or a damaged O-ring.
Common Mistakes to Avoid (Even Pros Make These!)
Even with careful planning, mistakes can happen. Here are some of the most common errors we've seen, based on feedback from pex pipe and fitting supplier experts and seasoned plumbers:
1. Skipping the Deburring Step
It's tempting to skip deburring, especially when you're in a hurry, but rough edges can tear the fitting's O-ring or create a weak spot in the pipe. Always deburr both inside and outside the pipe—this takes 10 seconds and prevents major leaks.
2. Using the Wrong Tool Size
Crimp and clamp tools come in sizes (e.g., ½-inch, ¾-inch) that must match the pipe diameter. Using a ¾-inch tool on a ½-inch fitting will result in a loose crimp, while using a ½-inch tool on a ¾-inch fitting will over-crimp and crack the pipe. Double-check the tool and fitting sizes before starting.
3. Over-Tightening Push-Fit Fittings
Push-fit fittings are designed to "click" into place with minimal force. Forcing the pipe too far into the fitting can damage the O-ring or distort the pipe. Follow the supplier's instructions—most recommend pushing until you feel resistance, then giving a small tug to ensure it's secure.
4. Exposing PEX to UV Light
PEX pipes degrade when exposed to sunlight for extended periods. If running pipes outdoors or in a sunlit attic, wrap them in UV-resistant tape or cover them with insulation. Your pex pipe and fitting supplier may also offer black PEX pipes, which have added UV protection.
5. Ignoring Pipe Support
While PEX is flexible, it still needs support to prevent sagging. Use PEX hangers or clips every 32–48 inches for horizontal runs and every 12–18 inches for vertical runs. This prevents stress on joints and keeps the system stable over time.
Maintaining Your PEX System: Tips for Longevity
With proper installation and care, a PEX system can last 40–50 years. Here's how to keep it in top shape:
- Inspect Annually: Check joints, valves, and exposed pipes for leaks, corrosion, or damage. Look for signs of moisture around fittings—this is often the first clue of a slow leak.
- Avoid Chemical Damage: PEX is resistant to most household chemicals, but harsh solvents (like paint thinner) can degrade the pipe. Keep chemicals away from PEX lines, and if using a drain cleaner, ensure it's PEX-safe (ask your supplier for recommendations).
- Insulate in Cold Areas: While PEX resists freezing, it's still a good idea to insulate pipes in unheated basements, crawl spaces, or attics. Foam pipe insulation (available at most hardware stores) adds an extra layer of protection.
- replace Old Fittings: Over time, O-rings in push-fit fittings can wear out. If you notice a fitting is leaking even after re-crimping, replace it with a new one. Most pex pipe fittings solutions include replacement O-rings, but it's often easier to swap the entire fitting.
Choosing the Right Supplier: Your Partner in Success
We've talked a lot about tools, techniques, and materials—but none of it matters if you're working with a subpar supplier. A reliable pex pipe and fitting supplier is more than just a vendor; they're a partner who can help you navigate challenges, answer questions, and ensure your project succeeds. Here's what to look for when choosing a supplier:
1. Quality Certifications
Reputable suppliers will provide PEX pipes and fittings that meet industry standards, such as ASTM F876/F877 (for PEX pipes) or CSA B137.5 (for fittings). Ask to see certification documents—if a supplier can't provide them, walk away. Certified products are tested for pressure, temperature, and durability, giving you peace of mind.
2. Range of pex pipe fittings solutions
Every project is unique, and you need a supplier that offers more than just basic pipes and fittings. Look for suppliers with a wide range of pex pipe fittings solutions , including manifolds, valves, expansion tools, and specialty fittings for radiant heating or commercial applications. This saves you time and money by allowing you to source all materials from one place.
3. Technical Support
Even experienced plumbers have questions. A good supplier will have a team of experts on hand to help with installation advice, code questions, or troubleshooting. Some suppliers even offer on-site training or video tutorials for new products. Avoid suppliers who are vague about their products or unwilling to help—this is a red flag for poor customer service.
4. Warranty and Returns
A strong warranty shows a supplier stands behind their products. Look for warranties of at least 10–15 years on pipes and fittings. Also, check the return policy—you should be able to return unused materials within a reasonable timeframe (30–60 days) if your project needs change.
Final Thoughts: Install with Confidence
PEX pipe fittings installation doesn't have to be intimidating. With the right tools, careful preparation, and guidance from a trusted pex pipe and fitting supplier , you can create a plumbing system that's durable, efficient, and leak-free. Remember: the key is to take your time, avoid shortcuts, and never hesitate to ask for help when you need it. Whether you're a DIYer tackling your first project or a contractor managing a large build, following these tips will set you up for success. And when it comes to materials, don't settle for less—invest in quality pex pipe fittings solutions from a supplier who cares about your project as much as you do. Your future self (and your wallet) will thank you.
Tags:
Recommend Products


