PEX Pipe and Fittings Accessories: 15 Types You Need to Know

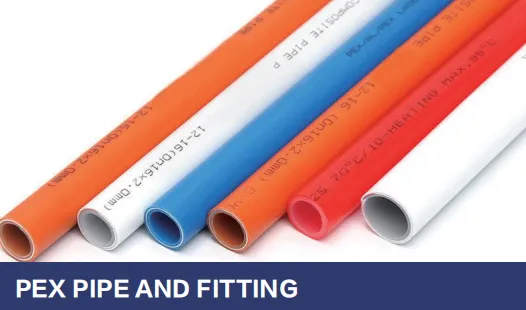
Let's be real—when you're tackling a plumbing project, whether it's a bathroom remodel, a kitchen upgrade, or fixing that annoying leak under the sink, the last thing you want is to stare at a pile of pipe parts and think, "What on earth do I do with this?" PEX pipes have become a go-to for homeowners and pros alike because they're flexible, durable, and easier to work with than traditional copper or galvanized steel. But here's the thing: even the best PEX pipe is only as good as the fittings and accessories that connect it. That's why we're breaking down 15 must-know PEX pipe and fittings accessories—no jargon, just straight talk about what they are, when to use them, and why they matter.
Whether you're a DIY enthusiast getting your hands dirty for the first time or a contractor looking to brush up on the basics, this guide will walk you through the essentials. From the tools that make connections a breeze to the little parts that prevent big headaches down the line, we've got you covered. And hey, by the end, you'll not only sound like a pro when talking about PEX systems—you'll actually know what you're talking about.
1. PEX Crimp Fittings: The Classic Connection
What Are They?
Crimp fittings are the OGs of PEX connections. Think of them as the reliable old friend who's never let you down. They're made of brass (most commonly) or poly alloy and work by sliding a metal crimp ring over the PEX pipe, then using a crimp tool to squeeze the ring tight around the fitting. It's like giving the pipe and fitting a big, secure hug that won't let go.
When to Use Them
These are your workhorses for most residential plumbing jobs. Whether you're running hot water lines to the shower, cold water to the fridge, or radiant heating loops under the floor, crimp fittings handle it all. They're affordable, widely available, and compatible with all types of PEX (PEX-A, PEX-B, PEX-C)—though you'll want to check the fitting specs to be sure.
Pro Tip: Always use the right size crimp ring for your pipe (e.g., 1/2-inch ring for 1/2-inch PEX). A ring that's too big won't crimp properly, and one that's too small might damage the pipe. And invest in a good crimp tool—cheap tools can lead to loose connections and leaks.
2. PEX Press Fittings: The Time-Saver
What Are They?
If crimp fittings are the reliable old friend, press fittings are the efficient new coworker who gets the job done in half the time. Instead of a separate crimp ring, these fittings have a built-in stainless steel sleeve. You slide the PEX pipe over the fitting, then use a press tool to compress the sleeve—done. No fumbling with rings, no guessing if you've crimped it tight enough.
When to Use Them
Press fittings shine when you're working in tight spaces (hello, crawl spaces and wall cavities!) or need to make a lot of connections quickly. Pros love them for commercial jobs or large residential projects because they cut down on installation time. They're also great if you're not super confident with a crimp tool—press tools are more foolproof, reducing the risk of human error.
Heads up: Press tools are pricier than crimp tools, so if you're a casual DIYer, you might want to rent one instead of buying. But if you're tackling multiple projects, the time saved might be worth the investment.
3. Push-to-Connect Fittings: The "No Tools" Wonder
What Are They?
Ever wished you could connect pipes without hauling out a toolbox? Push-to-connect fittings (sometimes called "push-fit" or "quick-connect") make that dream a reality. They look like little plastic or brass cylinders with a release collar. You simply cut the PEX pipe straight, push it into the fitting until it clicks, and boom—connected. To remove, just press the release collar and pull the pipe out. It's like the plumbing version of a USB port.
When to Use Them
These are perfect for emergency repairs or temporary fixes when you don't have tools on hand. Forgot your crimp tool at home? Push-to-connect has your back. They're also great for tight spots where using a tool would be impossible—like behind a toilet or under a sink. That said, most pros recommend using them for temporary setups or non-critical lines (not your main water supply) because they can be more prone to leaking if not installed perfectly.
Heads Up: Make sure the PEX pipe is cut clean and straight—any burrs or angles will prevent a tight seal. Also, check the fitting's temperature rating if you're using it for hot water; some plastic push-to-connect fittings aren't meant for high heat.
4. PEX Elbows: Turning Corners Without the Fuss
What Are They?
Ever tried to bend a rigid pipe around a corner? Spoiler: It doesn't work. That's where elbows come in. PEX elbows are fittings with two openings at a 90-degree angle (or sometimes 45 degrees) that let you redirect the flow of water around walls, studs, or other obstacles. They're like the hinges of your plumbing system—without them, your pipes would be stuck going straight forever.
When to Use Them
Any time your pipe needs to make a turn, you'll reach for an elbow. Installing a vanity? You'll need an elbow to go from the wall to the faucet. Running a line from the water heater to the upstairs bathroom? Elbows will help navigate around floor joists. They come in crimp, press, and push-to-connect styles, so you can match them to your connection method.
Pro tip: For tight 90-degree turns, use a "street elbow" (one end is male, one is female) to save space. And if you're working with PEX-A (the most flexible type), you can sometimes bend the pipe itself into a gentle curve instead of using an elbow—just don't kink it!
5. PEX Tees: Splitting the Flow
What Are They?
Imagine you have a main water line, and you need to split it to feed both the kitchen sink and the dishwasher. That's where a tee comes in. Tees are fittings with three openings (like the letter "T") that let you split a single pipe into two branches. They're the traffic directors of your plumbing system, making sure water gets where it needs to go without chaos.
When to Use Them
Any time you need to add a new fixture to an existing line. Installing a wet bar in the basement? Use a tee to split the cold water line from the main. Adding a second shower head? A tee will split the hot water line. They're also essential for radiant heating systems, where you need to split the main loop into multiple zones (think: different rooms with separate thermostats).
Tees come in different sizes, so make sure the main opening matches your existing pipe, and the branch openings match the new lines. For example, a 3/4-inch x 1/2-inch x 1/2-inch tee would split a 3/4-inch main line into two 1/2-inch branches.
6. PEX Couplings: Joining Pipes Like a Pro
What Are They?
Couplings are the simplest fittings in the bunch, but don't sleep on them—they're the glue that holds your PEX system together (metaphorically, of course). They're short, straight fittings with two openings that let you connect two pieces of PEX pipe end-to-end. Think of them as the pipe equivalent of a zip tie, but way more permanent and leak-proof.
When to Use Them
Need to extend a pipe that's too short? Coupling. Accidentally cut a pipe too small? Coupling. Repairing a section of damaged PEX? Cut out the bad part, add two couplings, and a new piece of pipe in between. They're also handy for connecting different types of PEX—say, PEX-A to PEX-B—though you'll want to check that the coupling is compatible with both.
Pro move: For repairs, use a "repair coupling" (sometimes called a "slip coupling") which has a sliding sleeve that lets you connect pipes without moving the existing ones. It's a lifesaver when you're working in tight spaces where you can't pull pipes apart.
7. PEX Valves: Controlling the Flow
What Are They?
Valves are the on/off switches of your plumbing system. They let you shut off water to a specific fixture or section of pipe without turning off the entire house. Ever had to fix a leaky faucet and didn't want to turn off the main water? A valve would have saved you from mopping up the kitchen floor. PEX valves come in a few flavors: ball valves, gate valves, and check valves, each with a specific job.
When to Use Them
- Ball Valves: These have a lever handle and a small ball inside with a hole through it. Turn the lever 90 degrees, and the hole lines up with the pipe (water on); turn it back, and the ball blocks the flow (water off). They're fast-acting and great for fixtures like toilets, sinks, and washing machines.
- Gate Valves: These use a wheel handle that raises or lowers a metal gate to control flow. They're slower to open/close but good for regulating water volume (though not as precise as ball valves). You'll often find them on main water lines.
- Check Valves: These are one-way streets for water. They let water flow in one direction but block it from flowing backward—perfect for preventing backflow in sump pumps or between hot and cold water lines.
8. PEX Adapters: Bridging the Gap Between Materials
What Are They?
Unless you're building a house from scratch with all-PEX plumbing (lucky you), chances are you'll need to connect PEX pipes to other materials—like copper, galvanized steel, or even PVC. That's where adapters come in. They have one end designed for PEX (crimp, press, or push-to-connect) and the other end threaded, soldered, or glued to match the other pipe material. It's like having a translator between two different plumbing languages.
When to Use Them
Common scenarios include connecting a PEX water line to a copper shutoff valve under the sink, linking PEX to a galvanized steel main line, or attaching PEX to a PVC drain pipe. For example, if your old water heater has copper outlets, you'd use a PEX-to-copper adapter to connect your new PEX lines. Just make sure the adapter is rated for the type of fluid (hot/cold water) and pressure you're dealing with.
Important: If you're connecting PEX to copper, avoid direct contact between the two metals—they can react and cause corrosion. Use a dielectric union (a special adapter with a plastic or rubber barrier) to prevent this. Your pipes (and wallet) will thank you.
9. PEX Support Brackets: Keeping Pipes in Place
What Are They?
PEX is flexible, which is great for installation—but that flexibility means it can sag, kink, or rub against studs if not properly supported. Support brackets (or clips) are small, usually plastic or metal, and attach to walls, joists, or beams to hold PEX pipes securely in place. Think of them as the seatbelts for your pipes—they keep everything where it should be, even when water is rushing through.
When to Use Them
Everywhere! Seriously, building codes require PEX pipes to be supported at specific intervals: typically every 32 inches for horizontal runs and every 6 feet for vertical runs (check your local code for exact numbers). They're especially important for hot water lines, which can expand and contract with temperature changes—without support, the movement can loosen connections over time.
Pro tip: Use plastic brackets for PEX to avoid scratching the pipe. And don't overtighten the brackets—you want to hold the pipe securely, not crush it. A little wiggle room is okay for expansion.
10. PEX Insulation Sleeves: Keeping Hot Water Hot (and Cold Water Cold)
What Are They?
Ever noticed how the water from your shower gets cold faster in the winter? Blame it on uninsulated pipes. PEX insulation sleeves are foam or rubber tubes that slide over PEX pipes to keep hot water hot and cold water cold. They also prevent condensation on cold pipes (say goodbye to that damp spot under the sink!) and protect pipes from freezing in cold climates.
When to Use Them
Insulate all hot water lines—you'll save energy (and money on your utility bill) by reducing heat loss. Cold water lines in humid areas (like basements or crawl spaces) should also be insulated to prevent condensation, which can lead to mold or water damage. And if you live in a region with freezing temperatures, insulate any PEX pipes that are exposed to the cold (even in walls or attics)—frozen pipes can burst, causing major damage.
Insulation sleeves come in different thicknesses; the thicker the sleeve, the better the insulation. Look for sleeves with a slit down the side—they're easier to install on existing pipes than solid tubes.
11. PEX Manifolds: The Traffic Control Center
What Are They?
If your plumbing system were a city, the manifold would be the central hub where all the roads (pipes) meet. A PEX manifold is a box with multiple outlets that connects to the main water line, then distributes water to individual fixtures (like sinks, toilets, and showers) through separate PEX lines. Instead of teeing off a main line repeatedly, each fixture gets its own dedicated line from the manifold.
When to Use Them
Manifolds are a game-changer for whole-house plumbing or radiant heating systems. They make it easy to shut off water to individual fixtures (no more turning off the main!), reduce pressure drops (since water isn't splitting at multiple tees), and minimize noise (no more water hammer from competing fixtures). They're especially popular in high-end homes or any project where you want maximum control and efficiency.
Most manifolds have separate hot and cold water sections, and some even let you adjust water pressure to each outlet. They're typically installed in basements, utility rooms, or closets—somewhere accessible but out of the way.
12. PEX End Caps: Plugging the Holes (Literally)
What Are They?
Ever finished a plumbing project and realized you have an extra pipe end sticking out with nothing connected to it? End caps are the simple solution. They're small, solid fittings that seal off the end of a PEX pipe, preventing water from leaking out. Think of them as the plumbing equivalent of a bottle cap—no frills, just a tight seal.
When to Use Them
Common uses include capping off unused outlets on a manifold, sealing the end of a pipe that's temporarily disconnected (like during a renovation), or plugging a pipe that was cut too short and needs to be extended later. They're also handy for testing a plumbing system—cap off the ends, turn on the water, and check for leaks before connecting fixtures.
End caps come in crimp, press, and push-to-connect styles, so pick the one that matches your connection method. And don't skimp on quality—even a small leak from a loose end cap can cause big damage over time.
13. PEX Reducers: Sizing Down (or Up)
What Are They?
Not all pipes are created equal—sometimes you need to connect a larger PEX pipe to a smaller one (or vice versa). Reducers (or increasers, if going from small to large) are fittings with two different-sized openings that let you transition between pipe sizes. For example, a 3/4-inch to 1/2-inch reducer would connect a 3/4-inch main line to a 1/2-inch branch line for a sink.
When to Use Them
Reducers are essential when the water flow needs to change size. Main water lines are usually larger (3/4-inch or 1 inch) to handle high flow, while individual fixtures (sinks, toilets) use smaller lines (1/2-inch) since they don't need as much water. So, if you're splitting a 3/4-inch main line to feed a 1/2-inch toilet line, you'd use a reducer tee (a tee with one large opening and two small ones) or a regular tee plus a reducer.
Pro tip: Make sure the reducer is compatible with your PEX type and connection method. Also, check the flow rate—reducing the pipe size too much can cause pressure drops, leading to weak water flow at fixtures.
14. PEX Expansion Rings: For PEX-A Systems
What Are They?
PEX-A is the most flexible type of PEX, and it uses a unique connection method called "expansion." Instead of crimping or pressing, you use an expansion tool to stretch the end of the PEX pipe, slide on an expansion ring and a PEX-A fitting, then let the pipe shrink back to its original size—creating a super tight seal. Expansion rings are usually made of rubber or plastic and are designed specifically for PEX-A.
When to Use Them
If you're using PEX-A pipe, expansion rings are a must. They create a strong, leak-proof connection that can handle high temperatures and pressures (perfect for radiant heating systems). The expansion method is also gentler on the pipe than crimping, reducing the risk of damage. That said, it requires a special expansion tool, which can be pricey—so if you're only doing a small project, crimp or press fittings might be more cost-effective.
Fun Fact: PEX-A can be bent into tight curves without kinking, so you might need fewer elbows when using expansion fittings—saving time and money on materials!
15. PEX Clamps: Holding It All Together (Literally)
What Are They?
No, we're not talking about crimp rings again—though clamps serve a similar purpose, they're a different beast. PEX clamps (sometimes called "cinch clamps" or "stainless steel clamps") are metal bands with a small tab that's squeezed with a clamp tool to secure the PEX pipe to the fitting. They look like tiny hose clamps and are an alternative to crimp rings.
When to Use Them
Clamps are popular because they're compatible with all PEX types and can be installed with a single clamp tool (unlike crimp rings, which require different tools for different sizes). They're also easier to inspect—you can see the tab to make sure it's properly crimped. Many pros prefer clamps for large projects because they're faster to install than crimp rings, especially in tight spaces.
One thing to note: Clamps are usually made of stainless steel, which resists corrosion—great for damp environments like basements or crawl spaces. Just make sure to position the clamp correctly (about 1/8 inch from the end of the pipe) for a secure seal.
| Accessory Type | Best For | Pro Tip |
|---|---|---|
| Crimp Fittings | Most residential plumbing projects | Use the right size crimp ring and tool |
| Press Fittings | Tight spaces, quick installations | Rent the press tool if you don't use it often |
| Push-to-Connect | Emergency repairs, temporary setups | Cut pipe straight and clean—no burrs! |
| Elbows | Turning corners around obstacles | Use 45-degree elbows for gentler turns |
| Valves | Shutting off water to fixtures | Ball valves are faster than gate valves |
Wrapping It Up: Why These Accessories Matter
At the end of the day, PEX pipes are just the starting point. The fittings and accessories you choose can make or break your plumbing project—whether that means a leak-free system that lasts for decades or a frustrating mess of drips and repairs. From the humble coupling to the high-tech manifold, each accessory plays a role in keeping water flowing where it should and staying out of where it shouldn't.
So the next time you're standing in the plumbing aisle, staring at a wall of fittings, remember: You've got this. You know the difference between a crimp and a press fitting, when to reach for a tee instead of an elbow, and why that little end cap is actually a lifesaver. And if you ever feel overwhelmed, just think—every pro was once a beginner who took the time to learn the basics.
Whether you're tackling a DIY project or working with a contractor, investing in quality PEX pipe and fittings accessories will save you time, money, and headaches in the long run. And when you find a supplier that offers reliable pex pipe and fitting solutions, stick with them—having a go-to source for all your plumbing needs makes every project that much easier. Happy plumbing!
Tags:
Recommend Products


