
When it comes to high-pressure piping systems, reliability and durability are non-negotiable. Whether you're working on a commercial building, an industrial facility, or a large-scale institutional project, the choice of piping material can make or break the system's performance over time. CPVC SCH80 has emerged as a top contender in this space, prized for its ability to withstand high temperatures, chemical corrosion, and intense pressure—all while being lightweight and easy to install compared to metal alternatives. But even the best materials fall short without proper installation. This guide is designed to walk you through every step of installing a CPVC SCH80 high pressure piping system, from preparation to pressure testing, ensuring your project meets safety standards and stands the test of time. We'll also touch on why partnering with a trusted cpvc sch80 high pressure piping system supplier matters, and how accessing the right cpvc sch80 high pressure piping system solutions can simplify your workflow and reduce long-term risks.
Before diving into installation, let's take a moment to appreciate why CPVC SCH80 is favored in high-pressure settings. CPVC, or chlorinated polyvinyl chloride, is a thermoplastic polymer modified to enhance heat and chemical resistance. The "SCH80" designation refers to the pipe's wall thickness, which is thicker than the standard SCH40, making it capable of handling higher internal pressures—often up to 200 psi at 73°F, depending on the pipe size. This makes it ideal for applications like industrial process lines, fire sprinkler systems, chemical transport, and even hot water distribution in large buildings.
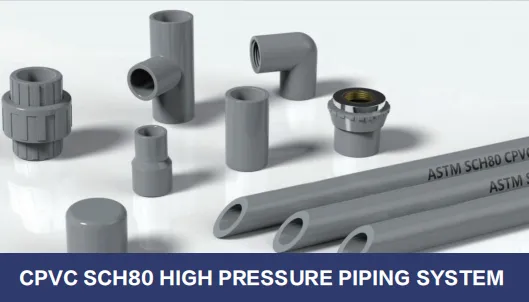
Unlike metal pipes, CPVC SCH80 resists corrosion from acids, alkalis, and saltwater, eliminating the risk of rust buildup that can restrict flow or weaken the system over time. It's also non-conductive, which is a safety advantage in electrical environments, and its smooth interior surface minimizes friction loss, ensuring efficient fluid flow. For installers, the lightweight nature of CPVC reduces labor costs and makes handling easier, especially in tight spaces. When sourced from a reputable cpvc sch80 high pressure piping system supplier, you can trust that the material meets ASTM standards (such as ASTM D2846, which specifies requirements for CPVC pipe and fittings), guaranteeing consistency and performance.
Installation begins long before the first pipe is cut. Proper preparation is critical to avoiding delays, mistakes, and costly rework. Here's what you need to do:
Start by reviewing the project plans in detail. Note the system's intended use (e.g., water supply, chemical transport, fire suppression), maximum operating pressure, and temperature range. This information will confirm that CPVC SCH80 is indeed the right material—most suppliers provide technical data sheets that outline pressure ratings for different temperatures and pipe sizes, so consult these if you're unsure. For example, a system carrying hot water at 180°F will have a lower pressure rating than one handling cold water, so it's crucial to align your installation with these specs.
Building codes vary by region, and high-pressure piping systems are often subject to strict compliance standards. Contact your local building department to verify requirements for pipe sizing, support spacing, pressure testing, and fire safety. Some areas may require permits or inspections at key stages (e.g., before covering walls), so factor these into your timeline. Ignoring codes isn't just a legal risk—it can compromise the system's safety and functionality.
The quality of your CPVC SCH80 pipes and fittings directly impacts installation success and long-term performance. Always source from a reputable cpvc sch80 high pressure piping system supplier with a track record of delivering compliant, durable products. Look for suppliers who offer comprehensive cpvc sch80 high pressure piping system solutions, including not just pipes and fittings but also technical support, installation guides, and warranty coverage. A good supplier will also ensure that all materials are properly labeled with specifications, batch numbers, and compliance marks (like ASTM or NSF certifications), giving you peace of mind that you're working with genuine, high-quality components. Avoid generic or unbranded products—they may not meet pressure or temperature standards, putting your entire system at risk.
Once your materials arrive, inspect them carefully before starting installation. Check for cracks, chips, or deformities in pipes and fittings. Ensure that fittings are the correct size and type (e.g., elbows, tees, couplings) for your project. Pay special attention to the ends of pipes—they should be smooth and square, with no burrs or rough edges that could interfere with sealing. If you notice any defects, contact your supplier immediately to arrange replacements. It's better to delay installation slightly than to proceed with faulty materials.
Having the right tools on hand will make the installation process smoother and more efficient. Below is a list of essential tools and materials, organized by their purpose:
| Tool/Material | Purpose | Notes |
|---|---|---|
| CPVC SCH80 Pipes | Main conduit for fluid transport | Ensure size matches project specs; available in 10ft or 20ft lengths |
| CPVC Fittings | Connect pipes at angles, branches, or endpoints | Include elbows (45°, 90°), tees, couplings, reducers, caps, and valves |
| CPVC Primer | Cleans and softens pipe/fitting surfaces for bonding | Use only CPVC-specific primer (not PVC primer, as it may not bond properly) |
| CPVC Solvent Cement | Creates a permanent bond between pipes and fittings | Choose a cement rated for high-pressure applications; check expiration date (old cement may not cure properly) |
| Hacksaw or Pipe Cutter | Cutting pipes to desired length | Use a fine-tooth hacksaw blade for clean cuts; pipe cutters with CPVC-specific blades are faster and more precise |
| Deburring Tool | Removes burrs and rough edges from cut pipe ends | Essential for preventing flow restriction and ensuring proper sealing |
| Primer Applicator (Brush or Dauber) | Applies primer to pipe and fitting surfaces | Use a clean applicator; avoid reusing brushes from other projects to prevent contamination |
| Cement Brush | Applies solvent cement to primed surfaces | Size should match pipe diameter (e.g., 1-inch brush for 1-inch pipe) |
| Measuring Tape and Marker | Marking cut lines on pipes | Use a permanent marker for visibility; double-check measurements before cutting |
| Level | Ensuring pipes are installed straight (horizontal) or plumb (vertical) | A 2-foot or 4-foot level works best for most applications |
| Pipe Supports (Clamps, Hangers) | Securing pipes to walls, ceilings, or floors | Spacing depends on pipe size (e.g., 1-inch pipe may require supports every 3 feet horizontally) |
| Teflon Tape or Pipe Dope | Sealing threaded connections (if using threaded CPVC fittings) | Use only on male threads; avoid over-tightening, which can crack fittings |
| Pressure Testing Equipment | Testing the system for leaks after installation | Includes a hand pump, pressure gauge, and test plugs |
| Safety Gear | Protecting installers during the process | Gloves (chemical-resistant), safety glasses, ventilation mask, and work boots |
Pro tip: Many pipes fittings suppliers offer tool kits specifically designed for CPVC installation, which can save time and ensure you have all the essentials. If you're unsure about which tools to buy, ask your supplier for recommendations—they'll likely have insights based on common project needs.
Now that you're prepared, let's walk through the installation process step by step. Take your time with each stage—rushing increases the risk of mistakes, especially when working with solvent cement, which requires precise timing.
Start by measuring the distance between fittings to determine pipe lengths. Use a measuring tape to mark the pipe, then double-check the measurement to avoid short or long cuts. For straight runs, add a small buffer (1/8 inch) to account for the depth of the fitting socket—most fittings have a "stop" inside that the pipe should bottom out against, so measure from the end of the pipe to this stop to get the correct insertion depth.
When cutting, use a hacksaw with a fine-tooth blade or a ratchet-style pipe cutter. For hacksaws, hold the pipe steady in a vice or with a pipe clamp to prevent it from rolling. Cut slowly and evenly, keeping the blade perpendicular to the pipe to ensure a square end. If using a pipe cutter, position the cutter around the pipe, tighten the blade until it makes contact, then rotate the cutter while gradually tightening—this will produce a clean, burr-free cut (though you'll still need to deburr later).
After cutting, use a deburring tool to remove any burrs from the inside and outside edges of the pipe. Burrs can restrict fluid flow, damage gaskets (if used), or prevent the pipe from seating fully in the fitting. insert the deburring tool into the pipe end and twist gently to smooth the inner edge; then, use the tool's outer chamfer to round the outer edge. This chamfer also helps the pipe slide into the fitting more easily during assembly.
Before applying primer or cement, dry fit all pipes and fittings to ensure they align correctly and the lengths are accurate. This is your chance to catch mistakes—if a pipe is too short, you'll need to cut a new one; if a fitting is in the wrong position, you can adjust before it's permanently bonded. During dry fitting, mark the pipe and fitting with a pencil at the insertion point (where the pipe meets the fitting) to ensure proper depth during the final assembly. This "alignment mark" is crucial—if the pipe isn't inserted all the way, the joint may leak under pressure.
Pay attention to support spacing during dry fitting, too. CPVC pipes need to be supported to prevent sagging, which can stress joints or cause flow issues. Refer to your supplier's guidelines for support spacing—typically, horizontal pipes require supports every 3–5 feet (depending on size), and vertical pipes every 8–10 feet. Install hangers or clamps at these intervals during dry fitting to ensure the system is stable once assembled.
Once dry fitting is complete, disassemble the system and prepare to prime. CPVC primer serves two key purposes: it cleans the surface of dirt, oil, and oxidation, and it softens the plastic, allowing the solvent cement to penetrate and create a strong bond. Always work in a well-ventilated area—primer fumes are strong, so open windows or use fans if indoors. Wear chemical-resistant gloves and safety glasses to protect against splashes.
Dip the primer applicator brush into the primer can, then apply a liberal coat to the outside of the pipe (up to the alignment mark) and the inside of the fitting socket. Ensure full coverage—missed spots can lead to weak bonds. Let the primer sit for 10–15 seconds; it should soften the plastic slightly, making the surface appear dull or tacky. Do not let the primer dry completely before applying cement.
Immediately after priming, apply CPVC solvent cement. Use a brush sized to the pipe diameter (e.g., a ½-inch brush for ½-inch pipe) and apply a thick, even coat to the primed pipe surface (again, up to the alignment mark). Then, apply a second coat to the inside of the fitting socket—this ensures there's enough cement to create a proper seal. Avoid applying too much cement, as excess can squeeze into the pipe and create blockages, but don't skimp either—a thin coat may not bond sufficiently.
Quickly insert the pipe into the fitting, pushing firmly until it reaches the bottom of the socket (aligning with your earlier mark). As you insert, give the pipe a ¼-turn twist to spread the cement evenly and ensure full contact. Hold the joint in place for 30–60 seconds (longer in cold weather) to prevent it from slipping—CPVC cement starts to set quickly, but the bond isn't strong enough to hold on its own immediately. Wipe away any excess cement with a clean rag before it dries—dried cement is difficult to remove and can leave unsightly residue.
Repeat this process for all joints, working in small sections if the system is large. Avoid moving or disturbing joints once they're assembled, as this can break the bond. If you make a mistake (e.g., misalign a fitting), you'll need to cut out the joint and start over—solvent cement creates a permanent bond, so there's no "undoing" it.
After assembly, let the system cure before pressure testing or putting it into service. Cure time depends on temperature, humidity, and pipe size—warmer, drier conditions speed up curing, while cold or humid weather slows it down. As a general rule: small pipes (½–1 inch) cure enough for pressure testing in 2 hours at 70°F; larger pipes (2 inches and above) may take 4–8 hours. Refer to the cement manufacturer's instructions for exact cure times. Avoid exposing newly assembled joints to moisture, extreme temperatures, or physical stress during curing—this can weaken the bond.
Once the cement has partially cured (after about 30 minutes to an hour, depending on conditions), secure the pipes to their supports. Use CPVC-specific hangers or clamps—avoid metal hangers with sharp edges, which can damage the pipe over time. Supports should be snug but not tight enough to compress the pipe, as this can restrict expansion and contraction (CPVC expands slightly when heated, so leave a small gap between the pipe and hanger to allow movement). For vertical runs, use pipe guides or riser clamps to prevent lateral movement.
Pressure testing is the final—and most critical—step to ensure the system is leak-free and ready for use. Follow these steps:
Working with CPVC SCH80 and solvent cement involves hazards that require careful attention. Here are key safety tips:
Primer and cement fumes are toxic and flammable. Always work in a well-ventilated area—open windows, use fans, or work outdoors if possible. If working in a confined space (e.g., a basement or crawl space), use a respirator with organic vapor cartridges to avoid inhaling fumes.
Solvent cement and primer can cause chemical burns or irritation. Wear nitrile or neoprene gloves (latex is not chemical-resistant) and safety glasses. If primer or cement gets on your skin, wash immediately with soap and water—do not use solvents like acetone, which can worsen irritation. For eye contact, flush with water for 15 minutes and seek medical attention.
CPVC itself is flame-resistant, but primer and cement are highly flammable. Keep all ignition sources (lighters, heaters, power tools with sparks) at least 50 feet away from the workspace. Have a fire extinguisher nearby, just in case.
Used primer and cement rags, empty cans, and cut pipe scraps are considered hazardous waste in many areas. Do not throw them in the regular trash—contact your local waste management facility for disposal guidelines.
A properly installed CPVC SCH80 system can last 50 years or more with minimal maintenance, but regular inspections will help catch issues early. Here's what to do:
Check joints, fittings, and valves monthly for signs of leaks (dripping, water stains, or mold). Look for cracks, bulges, or discoloration in pipes—these can indicate chemical damage or excessive pressure. In industrial settings, where pipes may be exposed to corrosive fumes, inspections should be more frequent.
CPVC is resistant to most chemicals, but some solvents (e.g., acetone, MEK, strong acids) can degrade the plastic. If using cleaning agents or additives in the system, check with your cpvc sch80 high pressure piping system supplier to ensure they're compatible.
Use pressure gauges and thermometers to ensure the system stays within its rated limits. Sudden spikes in pressure or temperature can stress pipes and fittings, leading to failure over time.
Even with careful installation, problems can arise. Here's how to address common issues:
The most common cause of leaks is improper priming or cement application. If a joint leaks during pressure testing, cut out the section, deburr the ends, and re-prime and cement new fittings. Ensure the pipe is fully inserted into the fitting and held long enough during assembly.
Restricted flow may be due to burrs left inside the pipe, excess cement blocking the line, or undersized pipes. If burrs are the issue, flush the system with high-pressure water; if cement is the culprit, you'll need to replace the affected section.
Cracks often result from physical damage (e.g., impact from tools) or exposure to incompatible chemicals. replace cracked pipes immediately to prevent leaks. Brittleness may indicate UV damage—CPVC is not UV-resistant, so outdoor installations should be painted or insulated to protect from sunlight.
Installing a CPVC SCH80 high pressure piping system requires attention to detail, patience, and a commitment to safety—but the result is a durable, efficient system that will serve your project for decades. By following this guide, sourcing materials from a trusted cpvc sch80 high pressure piping system supplier, and prioritizing proper preparation and curing, you'll minimize risks and ensure compliance with industry standards. Remember, the success of your installation depends not just on the steps you take today, but on the quality of the solutions you choose—so don't cut corners on materials or supplier support. Whether you're working on a small commercial project or a large industrial complex, a well-installed CPVC SCH80 system is an investment in reliability that pays off for years to come.
Recommend Products


