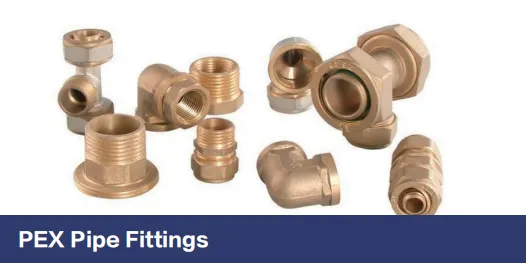
Installing 1/2-inch PEX pipe fittings is a common task in residential plumbing, from repairing a leaking joint to running new water lines for a bathroom or kitchen remodel. Many homeowners assume this job requires expensive crimping or expansion tools — but with the right fitting type, you can complete the installation using nothing more than basic hand tools you already own. This guide walks through the practical methods for installing 1/2 PEX fittings without specialized equipment, covering compression fittings, push-to-connect options, and a heat-based DIY approach when expansion fittings are your only choice.
Understanding 1/2 PEX Fittings and Connection Types
Before choosing an installation method, it helps to know the three main types of PEX fittings you are likely to encounter:
- Compression fittings — Use a nut-and-sleeve mechanism to create a watertight seal. They require only an adjustable wrench and are fully reversible.
- Push-to-connect fittings — Also called push-fit, these fittings grip the pipe internally when you push the PEX tubing into the fitting body. No tools at all are needed for installation.
- Expansion fittings — Require the PEX tubing to be stretched over a barbed fitting so it contracts and seals. These normally need a dedicated expansion tool, but alternative methods exist for small-diameter jobs.
For a no-special-tool installation, compression and push-to-connect fittings are the most straightforward choices. If you already have expansion fittings on hand and want to avoid buying a tool, the heat method described later offers a practical workaround. When sourcing your materials, working with a reliable pex pipe and fitting supplier ensures you get fittings that meet plumbing codes and perform reliably under pressure.
Method 1: Installing Compression Fittings
Compression fittings are the go-to option for tool-free PEX installation. They consist of three parts: a compression nut, a compression sleeve (ring), and a compression insert that prevents the tubing from collapsing. All you need is an adjustable wrench or a pair of pliers.
Step-by-Step Installation
- Cut the PEX tubing cleanly. Use a sharp PEX cutter to make a square, burr-free cut. A jagged or angled cut prevents proper sealing.
- Deburr the edges. Lightly sand both interior and exterior edges with fine sandpaper so nothing obstructs insertion.
- Slide on the compression nut and sleeve. Place the nut onto the tubing first (threads facing the cut end), then slide the compression ring behind it.
- insert the compression insert. Push the small plastic or metal insert into the end of the PEX tubing until it sits flush.
- Push the tubing into the fitting body. insert the prepared end fully into the fitting until it reaches the internal stop.
- Hand-tighten the nut. Thread the compression nut onto the fitting body by hand until snug.
- Finish with a wrench. Use an adjustable wrench to tighten the nut an additional quarter to half turn. Do not overtighten — this can crack the sleeve or strip threads.
The beauty of compression fittings is that they can be disassembled and reused. If you detect a leak during testing, simply loosen the nut, reposition the tubing, and retighten.
Method 2: Push-to-Connect Fittings (Zero Tools)
Push-to-connect fittings are the easiest option for DIY plumbing. These fittings contain an internal grab ring and an O-ring seal. You simply push the PEX tubing into the fitting until it clicks into place — no wrench, no crimper, no heat.
Step-by-Step Installation
- Make a clean, square cut. As with compression fittings, a straight cut is essential.
- Mark the insertion depth. Measure the depth of the fitting socket and mark the same distance from the end of the PEX tubing with a pencil. This ensures you can verify full insertion.
- Push the tubing into the fitting. insert the PEX tubing firmly into the fitting until it bottoms out and your pencil mark aligns with the fitting mouth.
- Pull back gently to confirm. Give the tubing a slight tug — the grab ring should hold it securely.
Important: Push-to-connect fittings grip the outside of the pipe, so the PEX surface must be clean, smooth, and free of scratches or debris. Any imperfection on the tubing surface can compromise the O-ring seal.
When purchasing high-quality pex pipe fittings, look for lead-free brass construction and NSF/ANSI 61 certification for potable water systems. Quality fittings from established suppliers are far less likely to fail under pressure than generic alternatives.
Method 3: Using Heat to Install Expansion Fittings
If you only have expansion-style fittings (the kind with barbs) and no expansion tool, you can soften the PEX tubing with heat to make it pliable enough to stretch over the fitting. This method works best on 1/2-inch tubing and is ideal for small repair jobs.
Hot Water Method
- Heat water to approximately 180-200°F (near boiling).
- Submerge the last 2 inches of the PEX tubing in the hot water for 1 to 2 minutes.
- Quickly remove the tubing and push it over the expansion fitting while it is still hot and soft. Use a twisting motion to help it slide past all the barbs.
- Hold the tubing in place and let it cool for several minutes. As it cools, it contracts and forms a tight seal around the fitting.
Hair Dryer Method
- Set a hair dryer to its highest heat setting.
- Direct the hot air onto the end of the PEX tubing for 1 to 2 minutes, rotating the tubing for even heating.
- insert the fitting while the tubing is still soft, pushing past all barbs.
- Allow the tubing to cool completely before testing.
Safety first: Always wear gloves when handling hot tubing. Keep the hair dryer away from standing water. Never overheat the PEX — if the tubing surface starts to bubble or discolor, you have gone too far and should cut off the damaged section and start fresh.
Common Mistakes to Avoid
- Skipping the deburring step. Burrs on the cut edge can tear the O-ring inside push-to-connect fittings or prevent a compression sleeve from seating properly. Always deburr.
- Forgetting the compression insert. On compression fittings, the insert prevents the PEX tubing from collapsing under the pressure of the tightened sleeve. Without it, the connection will almost certainly leak.
- Overtightening. Whether using compression nuts or push-to-connect fittings, more force is not better. A quarter-turn past hand-tight is all compression fittings need. Overtightening crushes the PEX and can crack brass components.
- Not fully inserting the tubing. The PEX must reach the internal stop inside the fitting. If the tubing is only partially inserted, the grab ring or compression sleeve will not engage on the right section of pipe.
- Mixing incompatible fitting types. Expansion fittings need PEX-A tubing (which has better shape memory). Compression and push-to-connect fittings work with all PEX types, but always verify the manufacturer's compatibility chart.
Testing Your Connections
After completing all connections, testing is non-negotiable. Turn the water supply back on slowly and inspect every joint:
- Look for visible drips or water beads at each fitting.
- Run a dry paper towel around each connection — any moisture will show immediately.
- For added confidence, pressurize the system to 100 psi and leave it for 30 minutes. If the pressure gauge holds steady, your connections are solid.
- Check again after 24 hours of normal use, as some slow leaks only appear after temperature cycling.
When to Call a Professional
While these methods work well for accessible 1/2-inch PEX connections, there are situations where professional help is the smarter choice. If the fitting is inside a finished wall cavity, requires working with hot water lines under pressure, or involves transitioning between PEX and copper pipe, the risk of water damage from a failed connection outweighs the cost savings of a DIY approach. For large-scale projects, a dedicated expansion or crimp tool is worth the investment or rental fee.
Installing 1/2 PEX fittings without special tools is entirely achievable with the right fitting type and careful technique. Compression and push-to-connect fittings make the process straightforward for any homeowner with basic hand tools, while the heat method offers a practical fallback for expansion fittings. The key to a leak-free installation is preparation — clean cuts, deburred edges, full insertion, and proper torque. Whether you are tackling a single repair or planning a whole-house rough-in, choosing quality fittings from a trusted pex pipe and fitting supplier gives you the best foundation for a plumbing system that lasts.