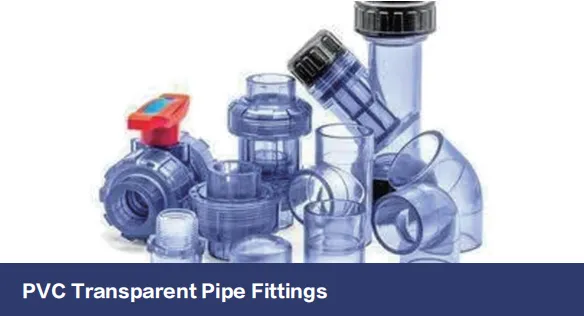
Ever wondered why some PVC installations last decades while others spring leaks within months? Working with PVC clear pipes is like building with glass - every flaw shows through. These see-through systems demand extra care because, let's be honest, any sloppy work is literally visible. Whether you're a DIY enthusiast or a seasoned pro, avoiding these common installation traps can save you gallons of frustration and buckets of repair costs.
The beauty of transparent PVC systems is you can actually watch fluids flow through them. But that visibility becomes a double-edged sword when installation mistakes start peeking through. We're going to walk through the 20 most frequent slip-ups people make with clear PVC fittings and, more importantly, how to dodge them like a pro.
Preparation Pitfalls: Where Most Jobs Go Wrong Before Starting
Rushing the Pre-Installation Checklist
Picture this: you're excited to start your project, unpack your shiny new clear PVC pipes, and dive right in. Big mistake. Skipping prep work is like jumping into a pool without checking the water depth. About 60% of installation failures trace back to poor preparation.
When you skip cleaning pipes, for example, that leftover manufacturing residue or dust becomes a barrier between your pipe and cement. For transparent pipes, contamination shows as cloudy patches or bubbles in your joints. And nobody wants that murky look in their crystal-clear system.
How to dodge this mistake:
-
The white glove treatment:
Wipe down every pipe interior and fitting with isopropyl alcohol - not water. Water leaves mineral deposits visible in clear systems.
-
Label everything:
Use painter's tape to mark cutting lines. For transparent pipes, laser guides prevent crooked cuts that become magnified eyesores.
-
Weather watch:
PVC gets temperamental below 40°F. If your materials feel cold, let them acclimate inside for 24 hours.
-
Test fit everything:
Dry-fit your entire system first. With clear pipes, misalignments glare like neon signs.
Choosing Cheap Cement to Save Pennies
We've all been tempted by that bargain-bin PVC cement, especially when budgets are tight. But generic adhesives and clear PVC? That's a disaster cocktail. Standard cures leave white residue that ruins the see-through aesthetic. Even worse, they often contain fillers that weaken bonds over time.
Fixing your cement choice:
-
Opt for crystal-clear formulas:
Specialized transparent PVC cements exist for a reason.
-
Check temperature ratings:
Hot climates need high-temp formulas; cold areas require winter-grade.
-
Fresh is best:
That crusty cement bottle from last year? Toss it. Cement expires faster than milk in summer.
-
Invest in primer:
Yes, the purple stuff seems messy, but it etches PVC for unbeatable adhesion.
Pro Tip:
When assembling your PVC system, remember that specialized clear PVC pipe connectors aren't just for looks. Using appropriate connectors ensures both visual clarity and system integrity.
Cutting & Assembly Blunders That Haunt You Later
The Hack Job - Crooked Cuts
It happens to the best of us - you're rushing, the saw slips, and suddenly you've got a pipe end that looks like a chewed toothbrush. With clear PVC, every imperfection magnifies. Crooked cuts mean uneven cement distribution and gaps that become visible weak points.
Making picture-perfect cuts:
-
Use a miter box:
$15 at the hardware store buys you professional-looking angles.
-
Rotary pipe cutters:
For pipes under 2", these give cleaner edges than saws.
-
Slow and steady:
Let the tool do the work - no forcing! Clear PVC cracks easier than standard pipes.
-
De-burr religiously:
That little chamfering tool isn't optional. It removes microscopic cracks that spread.
Dry-Fitting Gone Wrong
Test assemblies are smart, but leaving pipes dry-fit too long? Recipe for trouble. Clear PVC shows friction rub marks where fittings stretched material. These weak zones eventually fracture.
Safe dry-fitting protocol:
-
Time limit:
Never leave test assemblies for more than 10 minutes.
-
Use lubricant:
A dab of dish soap prevents friction damage during test fits.
-
Mark orientation:
Low-tack stickers help you recreate perfect alignments.
-
Inspect after:
Check for internal scratches before final assembly.
The Cementing Ceremony: Where Magic or Mayhem Happens
The Goldilocks Problem - Cement Quantity
Too little cement: weak bond. Too much: messy squeeze-out that clouds clear pipes. Getting the amount right is critical for both strength and aesthetics.
Achieving cement perfection:
-
Brush size matters:
Match brush size to pipe diameter - 1/2" pipes need 1/2" brushes.
-
Double dip technique:
Apply cement to pipe, then fitting, then pipe again lightly.
-
Watch the clock:
Cement skins over in 30 seconds. Work in 5-foot sections max.
-
The twist:
Quarter-turn rotation ensures even distribution without creating bubbles.
The Impatient Plumber Syndrome
That urge to test your work after 10 minutes? Resist it! Clear PVC reveals internal damage from premature pressure testing as micro-fractures that look like spiderwebs.
Curing without losing your mind:
-
Know your product:
Cement bottles list cure times - follow them!
-
Temperature adjustment:
Add 50% more cure time for every 10°F below 70°F.
-
The tape trick:
Wrap painter's tape with "DO NOT TOUCH" notes and times.
-
First test gentle:
Start with 25% operating pressure and increase gradually.
Industry Insight:
When working with pressurized systems, always remember that
expansion joints
in your PVC installation prevent stress fractures from thermal movement. For transparent systems, choose clear connectors that maintain visual flow.
Support & Structural Sins
Hanger Horror Stories
Using metal clamps on PVC pipes is like wearing sandals on a hike. Clear pipes demand special support because they show stress marks more than opaque versions.
Supporting with style:
-
PVC-friendly hangers:
Use lined clamps that distribute pressure evenly.
-
Spacing matters:
Every 32" for horizontal pipes, every 48" for vertical.
-
Slide before fixing:
Leave expansion gaps at anchors - 1/4" per 10 feet of pipe.
-
Soft material buffers:
Felt strips between pipes and brackets prevent abrasion.
Sun Exposure Sabotage
UV rays murder clear PVC. Standard pipes yellow; clear ones become foggy and brittle. Yet people regularly install them in sun-exposed areas.
Sun-proofing strategies:
-
UV-resistant formulations:
Specify "UV-stable" clear PVC if sun exposure exists.
-
Paint shielding:
Water-based latex on outside only - never paint interiors!
-
Insulated wrapping:
Foam pipe insulation blocks UV without trapping moisture.
-
Schedule 80 sacrifice:
In critical sunlight areas, use UV-resistant pipe sleeves.
Environmental Factor Fumbles
Temperature Temptations
Working with PVC in extreme temperatures creates invisible time bombs. Cold makes joints brittle; heat causes over-flexing. Clear PVC shows stress patterns faster than opaque.
Weather-wise installation:
-
Know your limits:
No cementing below 40°F or above 90°F.
-
Climate control:
In garages/sheds, use portable heaters/AC during extreme seasons.
-
Material staging:
Keep pipes at room temperature 24 hours before cutting.
-
The shade rule:
Work under canopies if installing outdoors in summer.
Chemical Warfare Ignorance
Clear PVC systems often handle fluids where chemical compatibility is non-negotiable. Yet installers regularly skip chemical resistance charts.
Chemical defense tactics:
-
Chart check:
Always consult manufacturer chemical resistance tables.
-
Insulate aggressively:
Use compatible pipe wraps when handling aggressive chemicals.
-
Sealant upgrades:
For harsh chemicals, transition to CPVC or specialized clear polymer systems at joints.
-
Safety layers:
Install clear PVC within secondary containment trays.
Safety First:
When designing PVC systems that require regular flow visibility, choose transparent PVC pipe connectors to maintain both visual access and chemical compatibility. Always wear personal protective equipment when handling solvents.
Maintenance & Long-Term Oversights
The "Set It and Forget It" Fallacy
Even perfectly installed clear PVC needs checkups. Mineral buildup shows as streaks; algae growth looks like green smoke in your pipes.
Maintenance mastery:
-
Quarterly inspections:
Look for cloudiness at joints and abrasion marks.
-
UV scan:
Use a blacklight annually to detect early UV degradation.
-
Flow checks:
Note pressure drops indicating internal buildup.
-
Soft cleaning:
Vinegar solution flushes without damaging clear surfaces.
Mismatched Material Madness
Connecting different plastics to PVC clears seems harmless. Until expansion rates create stress fractures visible through the pipe wall.
Material compatibility harmony:
-
Transition properly:
Use manufacturer-recommended transition fittings.
-
Sealant bridge:
Apply flexible sealant between different materials.
-
Expansion zones:
Create wider gaps when connecting dissimilar plastics.
-
The double-support rule:
Place hangers adjacent to transitions.
Transparent PVC systems shouldn't be treated like standard plumbing projects. That visibility you value demands extra attention during installation. From prep work to final curing, every step needs consideration for both structural integrity and aesthetic perfection.
When you nail these techniques, your clear pipe system becomes not just functional plumbing, but a showcase piece. You'll spot potential problems before they turn catastrophic, thanks to that crystal-clear view into your system. And isn't that why you chose transparent fittings in the first place?