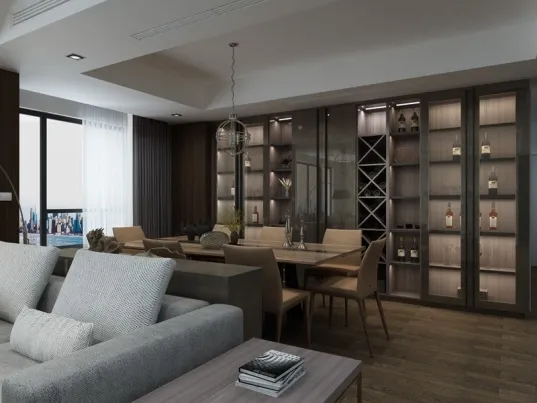
Transform Your Kitchen Into a Wine Lover’s Haven
You’ve dreamed of it—a sleek, temperature-controlled sanctuary for your favorite wines that doesn’t feel like an afterthought. A
built-in wine cabinet
isn't just a luxury; it’s the heart of sophisticated kitchen design. Forget cramming bottles in a corner fridge or dusting standalone racks. This guide walks you through creating a seamless extension of your culinary space that’s as functional as it is beautiful.
Picture opening elegant smoked-glass doors to reveal your collection glowing under soft LED strips—no cluttered countertop coolers or awkward gaps between cabinets. This is about merging passion with practicality, turning unused nooks into conversation-starting showpieces while protecting your investment in every sip.
Why Built-In Beats Freestanding Every Time
Ever tried squeezing a freestanding wine fridge into a kitchen remodel? It’s like forcing a puzzle piece where it doesn’t belong. Built-ins dissolve into your cabinetry, maintaining clean sightlines while offering serious advantages:
-
Space Whispering:
Utilizes awkward gaps (think next to dishwashers or under countertops) without stealing floor real estate
-
Climate Control Mastery:
Dual-zone cooling preserves Champagne at 45°F and bold reds at 65°F—no more guessing games
-
Silent Operation:
Advanced compressors hum quieter than your espresso machine, avoiding kitchen-disturbing vibrations
-
Value Boosting:
Realtors note built-ins increase perceived home value far beyond their cost
The Pre-Installation Blueprint: What You Can’t Afford to Miss
Location Scouting 101
Placement isn’t just about convenience—it’s survival for your wine. Avoid these rookie mistakes:
-
Sunlight Assassins:
UV rays degrade wine faster than cheap corks. No south-facing windows or under-skylight spots
-
Vibration Zones:
Never install near dishwashers, washing machines, or subwoofers. Micro-shakes disturb sediment and accelerate aging
-
Heat Islands:
Steer clear of ovens, radiators, or HVAC vents. Even 10°F fluctuations spoil delicate vintages
Ideal hideouts? Insulated interior walls near dining areas or butler’s pantries—somewhere with stable temps and easy entertaining access.
Measure Twice, Install Once
Cabinet depth quirks trip up even pros. Standard kitchens have 24-inch cabinets, but wine units often need 27 inches for ventilation. Grab your tape and check:
-
Clearance Headroom:
Allow 1/2-inch gaps at sides and 1 inch above for heat dissipation
-
Door Swing:
French door? Pull-out drawers? Account for trajectories so you’re not blocked mid-pour
-
Weight Loading:
A 30-bottle unit weighs 250+ lbs full. Verify floor joists can handle it (especially upstairs!)
Design Alchemy: Making Your Cabinet Feel Custom-Born
Here’s where magic happens—transforming appliance into art. Work with your kitchen’s personality, not against it:
Material Matching Tricks
Facing materials should whisper “I belong” rather than scream “aftermarket add-on.”
-
Wood Warriors:
Have oak cabinets? Order a matching wood door panel from the manufacturer
-
Modernist Metals:
Brushed stainless kitchens pair beautifully with metallic-finish frames
-
Glass Glam:
Smoked/tinted glass maintains cohesion with glass-front upper cabinets
Lighting as Jewelry
Forget blinding fridge lights. Install subtle LED tape:
-
Warm Whites (2700K):
Mimic candlelit ambiance—flatters reds beautifully
-
Smart Strips:
Voice-controlled dimming via Alexa? Yes please
-
Hidden Pathways:
Mount lights behind front rails to create floating bottle effects
Step-By-Step Installation: Your Stress-Free Roadmap
Ready for tools? Follow this sequence to avoid “why is this crooked?!” moments.
Stage 1: Framing Fortifications
-
Kill Power:
Shut off circuits for any nearby outlets at the breaker
-
Reinforce Cavity:
Add 2x4 braces between studs if cutting new openings
-
Mock Placement:
insert unit without fasteners. Check alignment with adjoining cabinets using laser levels
Stage 2: Electrical Wizardry
Most 36-inch units need dedicated 15-amp circuits. Don’t share with microwaves!
-
Outlet Placement:
Install behind adjacent cabinets (not behind unit) for service access
-
Grommet Pass-Throughs:
Drill cabinet sides for cords—never run them through insulation
Stage 3: The Mounting Dance
-
Slide unit fully into cavity with help (never solo!)
-
Predrill pilot holes through cabinet sides into unit frame
-
Secure with #8 cabinet screws—don’t overtighten!
-
Attach custom panels using manufacturer clips
Hidden Dangers: What Pros Never Tell You
Beyond YouTube tutorials lie critical nuances most regret learning too late:
-
Condensation Catastrophe:
Units below 60% humidity? Add passive humidity packs to prevent cork shrinkage
-
Vibration Insulation:
Line cavity with closed-cell foam before install to dampen compressor buzz
-
Future-Proofing:
Leave removable panels below unit if compressor needs replacing in 10 years
And remember—if installing near flammable cabinet materials, verify UL safety ratings first!
Post-Installation Secrets: Keeping Your Wines Happy
Your cabinet’s alive—treat it right for peak performance:
-
Break-In Period:
Run empty at max cold for 24 hours before loading bottles (stabilizes temps)
-
Quarterly Vacuuming:
Dust coils every 3 months with crevice tools to prevent overheating
-
Door Gasket Love:
Wipe food splatter off seals monthly to prevent air leaks
Notice frost buildup? Check door seals haven’t pinched during mounting. Humidity spiking? Remove bottles to rebalance airflow.
The Grand Finale: Uncork Your Masterpiece
There’s nothing like pouring a prized Bordeaux from a cabinet that feels destined for your kitchen. No Frankenstein gaps, no rattling noises—just harmonious luxury that celebrates your taste. Remember: Great integrations feel invisible until admired.
You’ve not just installed hardware; you’ve curated experiences. From date-night Chardonnays to anniversary reserves, every bottle now rests in its perfect sanctuary—a testament to thoughtful design. That first satisfied sip? You’ve earned it. Cheers to your impeccable taste!