
The bathroom is more than just a functional space—it's where we start and end our days, a private retreat where we unwind after a long workday, and a corner of the home that deserves as much care and attention as any living room or kitchen. But when it comes to renovations, many homeowners get caught up in choosing the perfect tiles, vanities, or bathtubs, often overlooking a critical component that can make or break the entire project: the plumbing. Specifically, the pipes and fittings that carry water to your shower, sink, and bathtub. That's where PPR pipe and fitting solutions come in—and trust me, once you understand their role, you'll never take them for granted again.
In this guide, we're going to walk through everything you need to know about PPR pipes and fittings for your bathroom renovation. From why they're a superior choice over other materials to how to install them, pair them with sanitary fixtures, and keep them in top shape for years, we'll cover it all. Whether you're a DIY enthusiast tackling your first renovation or a homeowner hiring a pro, this article will equip you with the knowledge to make informed decisions. Let's dive in.
Imagine this: You've spent months picking out the perfect marble tiles, a sleek freestanding bathtub, and a rainfall showerhead. The renovation is done, and you're thrilled—until the first time you turn on the hot water. The shower sputters, there's a leak under the sink, and within a year, the pipes start corroding, leaving rust stains on your new tiles. Sound like a nightmare? It is—and it's often the result of cutting corners on pipes and fittings.
Your bathroom's plumbing system is the silent workhorse. It delivers clean water for bathing, washing, and brushing teeth, and carries away wastewater efficiently. If the pipes are outdated, poorly installed, or made of inferior materials, you'll face constant issues: leaks, low water pressure, mold growth, and even structural damage from water seepage. That's why choosing the right pipes and fittings isn't just about functionality—it's an investment in the longevity and comfort of your home.
In recent years, PPR (Polypropylene Random Copolymer) pipes have emerged as a game-changer in bathroom plumbing. Unlike older materials like galvanized steel or even PVC, PPR offers a unique blend of durability, flexibility, and ease of installation that makes it ideal for modern bathrooms. Let's explore why PPR has become the go-to choice for homeowners and contractors alike.
PPR is a type of plastic pipe made from polypropylene random copolymer, a material known for its high heat resistance, chemical stability, and strength. It was first developed in Europe in the 1970s and has since become a global standard for plumbing systems, especially in residential and commercial buildings where hot and cold water supply is critical. Unlike traditional pipes, PPR pipes are joined using heat fusion, creating a seamless, leak-proof connection that's built to last.
So, what makes PPR better than other pipe materials for your bathroom? Let's break it down:
1. Unbeatable Heat Resistance: Bathrooms deal with hot water daily—showers, baths, sinks. PPR pipes can handle temperatures up to 95°C (203°F) continuously and even higher temperatures for short periods, making them perfect for hot water lines. Unlike PVC, which can warp or weaken under heat, PPR maintains its shape and structural integrity, ensuring consistent water flow for years.
2. Corrosion and Chemical Resistance: Bathroom water often contains minerals, cleaning agents, and even small amounts of chemicals from soaps and shampoos. PPR is resistant to corrosion, rust, and chemical degradation, so you won't have to worry about pipes deteriorating from the inside out. This is a huge advantage over metal pipes like copper or galvanized steel, which can corrode over time and contaminate water.
3. Leak-Proof Connections: One of the biggest causes of bathroom water damage is leaks at pipe joints. PPR pipes are fused together using heat, creating a molecular bond that's as strong as the pipe itself. No more relying on glue, soldering, or threaded connections that can loosen or degrade. This seamless joining method reduces the risk of leaks to almost zero when done correctly.
4. Lightweight and Easy to Install: PPR pipes are lightweight, which makes them easier to transport and handle during installation—great news if you're working in tight bathroom spaces. The heat fusion process is also relatively simple, even for DIYers with the right tools. Unlike copper pipes, which require soldering and specialized skills, PPR can be installed quickly, saving time and labor costs.
5. Cost-Effective in the Long Run: While PPR pipes might have a slightly higher upfront cost than PVC, their durability and low maintenance needs make them more cost-effective over time. You won't have to replace corroded pipes every few years, and leaks (which can lead to expensive water damage) are rare. It's an investment that pays off in peace of mind.
6. Eco-Friendly: PPR is a non-toxic material that doesn't release harmful chemicals into the water, making it safe for drinking water systems. It's also recyclable, so you can feel good about choosing a sustainable option for your home.
Now that we understand why PPR is a top choice for bathroom plumbing, let's explore the different types of PPR pipes and fittings available. Not all PPR products are created equal, and choosing the right ones depends on your specific needs—like water pressure, pipe size, and the type of fixture they'll connect to.
PPR pipes come in various sizes and pressure ratings to suit different applications in the bathroom. Here's what you need to know:
Sizes: PPR pipes are measured by their outer diameter (OD), typically ranging from 20mm (3/4 inch) to 110mm (4 inches). In most bathrooms, you'll use smaller sizes: 20mm or 25mm for hot and cold water lines to sinks, showers, and toilets. Larger sizes (like 32mm or 40mm) might be needed for main supply lines or if you have multiple fixtures running at once (e.g., a shower and a bathtub).
Pressure Ratings: PPR pipes are classified by their pressure tolerance, usually marked as PN (Pressure Nominal). Common ratings include PN10, PN16, and PN20, where PN10 can handle up to 10 bar (145 psi), PN16 up to 16 bar (232 psi), and PN20 up to 20 bar (290 psi). For residential bathrooms, PN10 or PN16 is typically sufficient. PN20 is better for high-pressure systems, like those with powerful showerheads or jacuzzis.
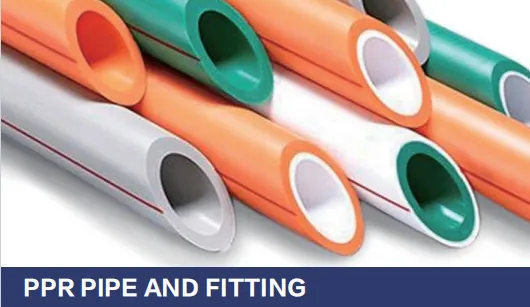
Color Coding: To make installation easier, PPR pipes are often color-coded: white or gray for cold water, green or red for hot water. This helps prevent mix-ups during installation—you don't want to connect a hot water line to a cold water fixture!
Pipes alone aren't enough—you need fittings to connect them, change direction, and control water flow. Here are the most common PPR fittings you'll encounter in a bathroom renovation:
Elbows: Used to change the direction of the pipe (90-degree or 45-degree angles). Essential for navigating around walls, corners, or other fixtures.
Tees: T-shaped fittings that split a single pipe into two branches. Useful for connecting multiple fixtures to one main line (e.g., a sink and a toilet sharing the same cold water supply).
Couplings: Straight fittings that join two pipes of the same diameter. Used to extend pipe lengths or repair a damaged section.
Reducers: Connect pipes of different sizes (e.g., a 25mm main line to a 20mm branch line for a sink).
Valves: Control the flow of water. Ball valves, gate valves, or check valves can be installed near fixtures to shut off water during repairs (e.g., a valve under the sink so you don't have to turn off the main water supply to fix a leaky faucet).
Adapters: Connect PPR pipes to other materials, like copper or threaded fixtures (e.g., a PPR pipe to a showerhead arm).
When choosing fittings, always opt for those made from the same PPR material as your pipes. Mixing materials can lead to leaks or incompatibility issues during fusion.
Installing PPR pipes might seem intimidating, but with the right tools and a little patience, it's manageable—even for beginners. Here's a step-by-step breakdown of the process:
Before you start, gather these tools:
First, map out your plumbing layout. Measure the distance between fixtures (sink, shower, toilet, bathtub) and the main water supply lines. Mark where pipes will run—avoid sharp bends or unnecessary turns, as these can reduce water pressure. If you're replacing old pipes, turn off the main water supply and drain the existing lines before removing them.
Cut the PPR pipes to the required lengths using a pipe cutter (for clean, straight cuts). After cutting, use the deburring tool to remove any burrs or rough edges from the pipe ends—this ensures a tight fit during fusion.
Fusion welding is what makes PPR pipes so leak-proof. Here's how to do it:
1. Heat the fusion machine: Plug in the heat gun and attach the appropriate nozzles (one for the pipe, one for the fitting). Let it heat up to the recommended temperature—usually around 260°C (500°F). Most machines have an indicator light that tells you when they're ready.
2. Clean the pipe and fitting: Use sandpaper to clean the outside of the pipe end and the inside of the fitting. Any dirt, oil, or moisture can weaken the bond, so make sure they're spotless.
3. insert pipe and fitting into the nozzles: Push the pipe onto the male nozzle and the fitting onto the female nozzle. Hold them in place for the recommended time (usually 5–10 seconds, depending on pipe size). Don't twist or move them during heating.
4. Remove and join: Carefully remove the pipe and fitting from the nozzles and immediately push them together with a slight twisting motion. Hold them firmly for 10–15 seconds to allow the material to cool and fuse. The joint should be smooth and even—if there's a gap or excess melted plastic, you may need to redo it.
Pro tip: Practice on scrap pipes first! Fusion takes a little getting used to, and it's better to mess up a piece of scrap than a pipe you need for your renovation.
Even pros make mistakes—here are a few to watch out for:
Overheating or underheating: If the machine is too hot, the plastic will burn; too cold, and the bond won't form. Follow the manufacturer's temperature guidelines.
Moving the joint while cooling: Twisting or pulling the pipe and fitting before they're fully cooled can weaken the bond, leading to leaks later.
Ignoring pipe support: PPR pipes need brackets or clips to hold them in place, especially over long runs. Without support, pipes can sag, causing stress on joints.
Forgetting to test the system: After installation, turn on the water and check for leaks. Let the system run for 30 minutes to ensure all joints are secure.
Your PPR pipes don't exist in a vacuum—they work hand-in-hand with your bathroom's sanitary fixtures and bathtubs to create a functional, beautiful space. Choosing the right fixtures and ensuring they're compatible with your PPR plumbing is key to a successful renovation.
Nothing ruins a relaxing bath like weak water flow. To ensure your bathtub or shower performs at its best, match the pipe size to the fixture's water demand. For example, a standard showerhead might work with a 20mm PPR pipe, but a high-flow rainfall showerhead or a jetted bathtub may need a 25mm pipe to deliver enough water pressure.
If you're installing a bathtub with built-in jets (like a spa tub), consult the manufacturer's guidelines for plumbing requirements. Some models need dedicated hot and cold water lines, and PPR's heat resistance makes it ideal for maintaining consistent water temperature—no more sudden cold bursts mid-bath!
Sinks, toilets, and bidets have different plumbing needs, and PPR pipes can handle them all. For sinks, a 20mm PPR pipe is usually sufficient for both hot and cold water lines. Toilets typically require a 15mm or 20mm cold water line (depending on the fill valve type). Bidets may need both hot and cold lines, so plan your PPR layout accordingly.
When installing fixtures, use PPR adapters to connect to threaded connections (e.g., the faucet's supply lines). Wrap Teflon tape around the threads to prevent leaks, but avoid over-tightening—this can crack the adapter or fixture.
Sarah, a homeowner in Riyadh, wanted to transform her outdated bathroom into a spa-like retreat. She fell in love with a freestanding bathtub from a local bathtub/spa supplier and chose sleek wall-mounted sinks for a modern look. Her contractor recommended PPR pipes, and here's why it worked:
"The old galvanized steel pipes were corroded, and we kept having leaks," Sarah recalls. "The contractor said PPR would be more durable and easier to install around the bathtub, which sits in the corner. They used 25mm PPR pipes for the bathtub supply to ensure strong water flow, and 20mm pipes for the sinks. The fusion joints are so smooth—you can barely see them behind the walls! It's been two years, and we haven't had a single leak. The bathtub fills up quickly, and the water pressure in the shower is perfect."
Sarah also appreciated that her sanitary fixtures/bathrooms supplier worked closely with the PPR pipe and fitting supplier to ensure compatibility. "They coordinated everything, so I didn't have to worry about whether the faucet would fit the pipes. It made the whole process stress-free."
Still not convinced PPR is right for your bathroom? Let's compare it to other common pipe materials to see how it stacks up.
| Material | Durability | Corrosion Resistance | Installation Ease | Cost | Best For |
|---|---|---|---|---|---|
| PPR | 50+ years (with proper installation) | Excellent—resistant to chemicals, minerals, and rust | Easy (heat fusion; minimal tools needed) | Moderate (higher than PVC, lower than copper) | Hot and cold water lines in bathrooms, kitchens, and residential buildings |
| PVC | 25–40 years | Good, but weakens under high heat | Easy (glued joints), but glue can degrade over time | Low | Cold water lines, drainage systems (not recommended for hot water) |
| Copper | 50+ years | Good, but prone to corrosion in acidic water | Difficult (requires soldering and specialized skills) | High | Historic homes, high-end renovations (but overkill for most bathrooms) |
| Galvanized Steel | 20–50 years (prone to rust inside) | Poor—rusts over time, leading to clogs and leaks | Difficult (threaded joints, heavy to handle) | Moderate to high | Older homes (rarely used in new renovations) |
As the table shows, PPR offers the best balance of durability, ease of installation, and cost for bathroom renovations. It's especially superior for hot water lines, which are a staple in any bathroom.
PPR pipes are low-maintenance, but they're not maintenance-free. With a little care, you can extend their lifespan and avoid costly repairs down the line.
Inspect your PPR pipes every 6–12 months for signs of trouble:
Leaks: Check under sinks, around bathtubs, and in walls for water stains, mold, or dampness—these are red flags for hidden leaks.
Discoloration: Yellow or brown spots on pipes could indicate mineral buildup or corrosion (though PPR is resistant, it's still worth checking).
Unusual noises: Banging or rattling pipes when you turn on the water might mean loose brackets or water hammer (a sudden pressure surge). Installing water hammer arrestors can fix this.
PPR pipes are smooth on the inside, so they're less prone to clogs than galvanized steel or cast iron. However, you should still avoid pouring grease, hair, or large debris down drains—use drain strainers in sinks and showers to catch hair, and dispose of grease in the trash, not the sink.
For minor clogs, use a plunger or a chemical drain cleaner (choose one safe for plastic pipes). Avoid using a plumber's snake on PPR pipes unless you're careful—excessive force can damage the pipe walls.
While many issues can be fixed DIY, some require a professional plumber:
Major leaks: If water is gushing from a pipe or you can't locate the source of a leak, call a pro immediately to prevent water damage.
Reduced water pressure throughout the bathroom: This could indicate a blockage in the main line or a problem with the municipal supply.
Cracks in pipes: PPR pipes are strong, but they can crack if hit by a heavy object (e.g., during a wall renovation). A pro can replace the damaged section using fusion welding.
Even with proper installation and maintenance, you might encounter issues with your PPR pipes. Here's how to troubleshoot the most common problems:
Leaky joints are the most common issue, often due to improper fusion. If you notice a leak:
Turn off the water supply: Use the nearest valve to shut off water to the affected area.
Drain the pipe: Open a faucet to release pressure and drain any remaining water.
Inspect the joint: If the joint is uneven or has gaps, you'll need to cut out the old joint and re-fuse a new fitting. This is best done by a pro if you're not confident in your fusion skills.
Low water pressure can stem from several causes:
Clogged aerator: The aerator (the small screen at the end of a faucet) can get blocked with sediment. Unscrew it, rinse it, and reattach.
Blocked pipe: Mineral deposits or debris might be blocking the pipe. Try flushing the line with a mixture of vinegar and water (let it sit for an hour, then run hot water).
Undersized pipes: If you recently added a new fixture (like a high-flow showerhead), your existing pipes might be too small. Upgrading to a larger PPR size (e.g., from 20mm to 25mm) can solve this.
PPR pipes can withstand cold temperatures, but they're not immune to freezing. When water freezes, it expands, potentially cracking pipes. To prevent this:
Insulate pipes: Wrap pipes in foam insulation, especially those in unheated areas like basements or crawl spaces.
Keep cabinets open: In cold weather, leave under-sink cabinets open to allow warm air to circulate around pipes.
Let faucets drip: A slow drip can prevent pressure buildup if water freezes.
Not all PPR products are created equal—choosing a reputable supplier is just as important as proper installation. Here's what to consider when selecting a PPR pipe and fitting supplier:
Quality Certifications: Look for suppliers whose products meet international standards, like ISO 9001 (quality management) or DIN 8077/8078 (PPR pipe standards). Certifications ensure the pipes and fittings are tested for durability and safety.
Range of Products: A good supplier should offer a variety of pipe sizes, pressure ratings, and fittings to meet your bathroom's specific needs. Avoid suppliers with limited options—you don't want to compromise on size or quality.
Customer Support: Renovations can be confusing—choose a supplier that offers technical support, whether it's help with pipe sizing or fusion tips. Some suppliers even provide installation guides or training for DIYers.
Reputation: Read reviews or ask for referrals from contractors or friends who've used the supplier. A company with positive feedback is more likely to deliver reliable products.
Remember, investing in high-quality PPR pipes and fittings from a trusted supplier might cost a little more upfront, but it will save you from headaches (and expenses) later.
Your bathroom renovation is a significant investment—one that should bring you joy and functionality for years to come. By choosing PPR pipe and fitting solutions, you're investing in a plumbing system that's durable, reliable, and designed to stand the test of time. From their heat resistance and leak-proof joints to their compatibility with modern sanitary fixtures and bathtubs, PPR pipes are the unsung heroes of a successful bathroom renovation.
Whether you're installing them yourself or hiring a pro, remember: proper planning, quality materials, and regular maintenance are the keys to success. Take the time to measure twice, choose the right sizes and pressure ratings, and test your system before finishing the walls. Your future self (and your wallet) will thank you.
So, as you embark on your renovation journey, don't overlook the pipes behind the walls. With PPR, you're not just building a bathroom—you're building a space that works as hard as you do, day in and day out. Here's to many years of leak-free showers, relaxing baths, and a bathroom you're proud to call your own.
Recommend Products


